 Composal
/Engineering
Claude rescued our YC launch video: here's what we learned
The first edit of our launch film took a week, missed the mark and pushed our launch back. We could not afford another delay, so we rebuilt it from the raw 4K footage with Claude Code in a day and got the launch back on track.
This is our launch film for Y Combinator. It is 82 seconds long. We shot it in one afternoon. Most of the edit, the motion graphics, the sound and the colour grade were then made in one long day with Claude Code.
It didn’t start that way. We hired out the first edit. It took a week and came back with problems, and every round of notes meant another wait. We had to push our launch back. As a startup we couldn’t afford to keep slipping, so we stepped in ourselves.
This post covers the advice we followed, what went wrong, how Claude helped us rebuild the film in a day, and what I would do again.
The advice we followed
YC’s guide to launch videos is short and good. Start with your one-liner. Get the viewer to the moment the product makes sense as fast as you can. Don’t tour every feature. In their words, “pick 2-3 key pieces of functionality and show short clips of these magic moments.”
The Launch YC guide adds that you don’t need anything overproduced. A minute of you talking to camera with a short demo works.
We took both seriously and added one rule of our own. Composal tests at three levels (Discovery, Deep Scan and Scenarios), and the film had to make each one clear. Everything else was cut.
A few more rules came from earlier attempts:
- Give people time to read. Our first animated cut moved too fast, so on-screen text now holds still for at least a second, plus a third of a second per word.
- Keep motion calm and physical. No glitch effects, light leaks or bouncing logos.
- Make the product UI the hero.
- Stay truthful. Every bug on screen is the kind our product really finds, and no customer is named.
The shoot
We wrote the script first. It opens with “A thousand agents. One person setting the direction.” On 22 October we shot ten takes in 4K, in Canon Log 2, from four set-ups: standing front, standing side, desk front and desk side. That came to 29 GB of footage.
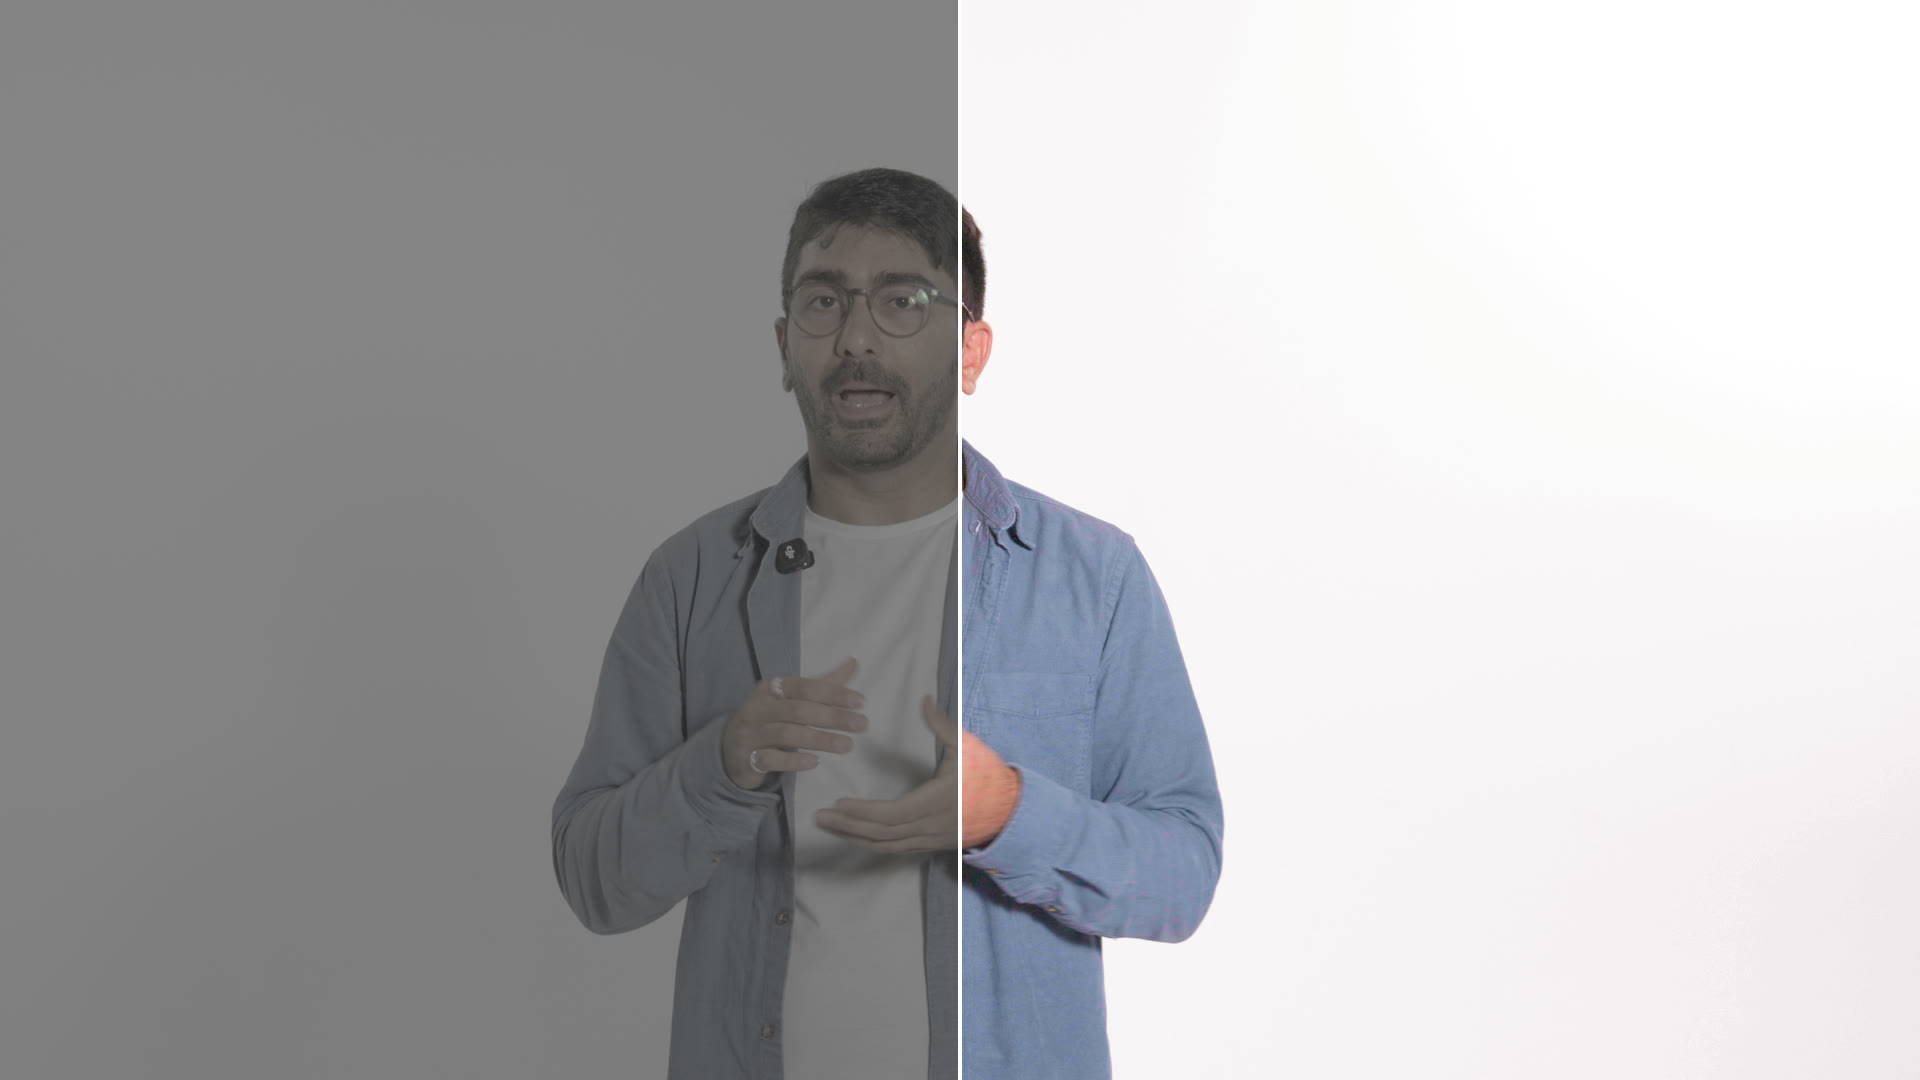
Log footage looks flat and grey straight out of the camera. That’s deliberate: it keeps detail in the bright white studio and in my face, and it leaves the colour decisions for the grade.
The first edit
We sent the footage to an editor. The cut that came back had good ideas. One shot put me in front of a wireframe app with 3D icons for build, test, ship and improve, and that idea made it into the final film.
The sound was the problem. The music sat almost as loud as my voice, and it didn’t dip when I spoke. We didn’t have the editor’s project or the separate audio tracks, only the finished file. So I asked Claude Code to measure it.
It split the finished mix into a voice track and a music track with Demucs, a model that separates speech from music. Then it measured both tracks, second by second.
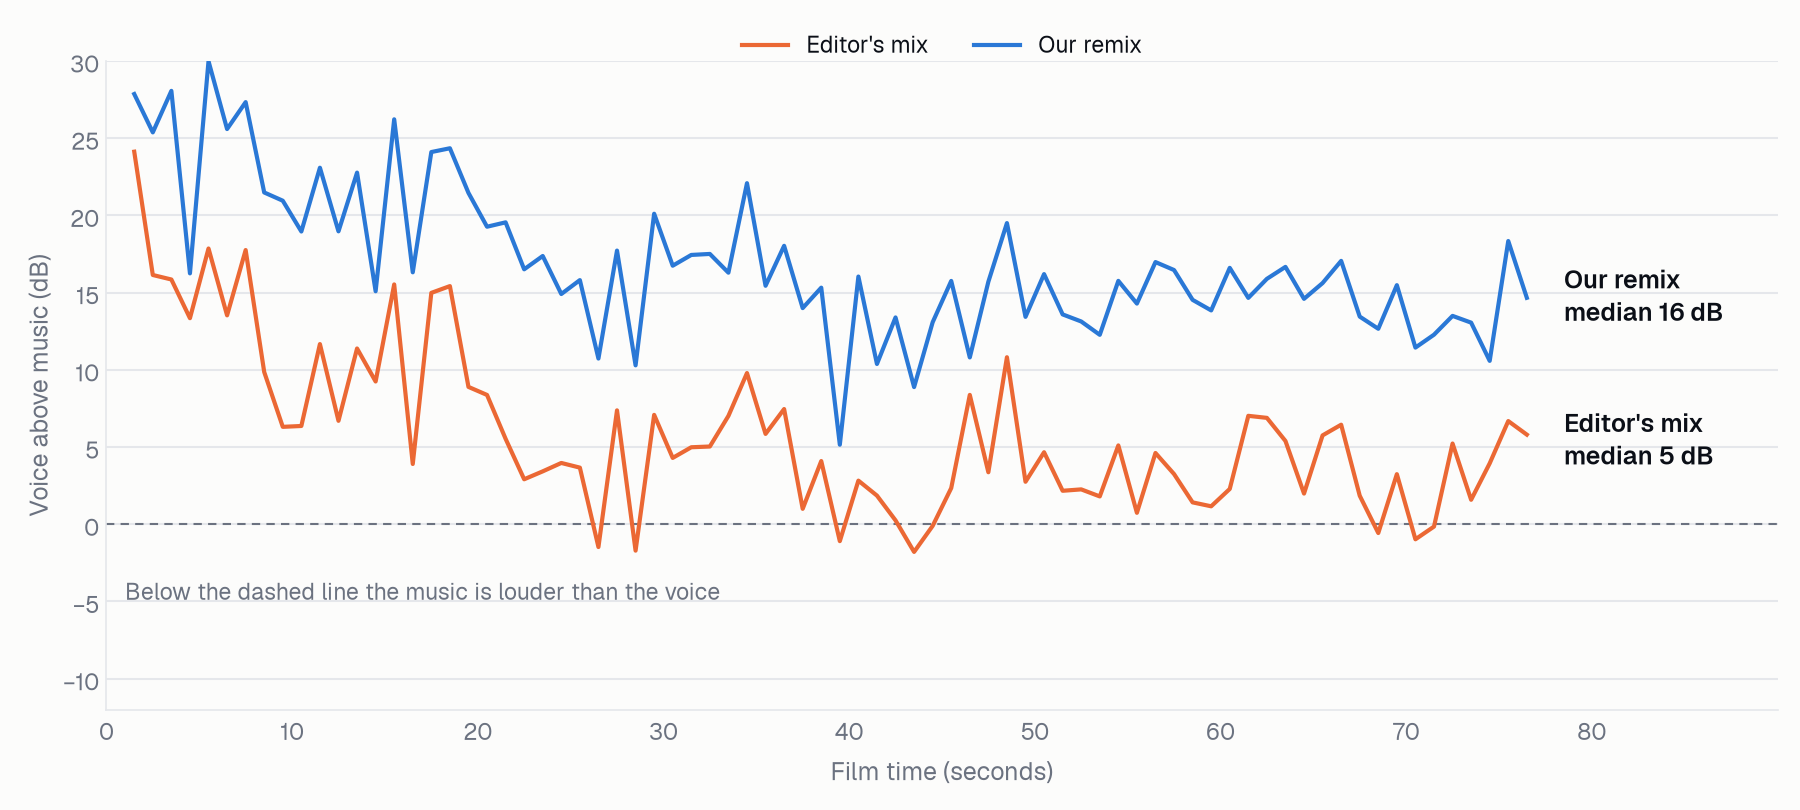
Claude remixed the two tracks so the music ducks under the voice and swells back in the pauses. The original mix was also quiet, so it raised the whole thing to -14 LUFS, a normal loudness for social video. The fix took 17 minutes, including captions and a few zooms on product panels too small to read on a phone.
That patch helped, but the film still didn’t say what we wanted, the way we say it. So we went back to the raw footage.
A week versus a day
Timing was the real problem, more than any single shot.
We filmed on 22 October. The first cut came back six days later, and it wasn’t good enough to launch with. Fixing it meant rounds of notes: write them up, send them, wait for the next version. That’s a normal pace for a videographer and an editor, but each round cost us days.
We had to push our launch back. For a startup, velocity is everything. Every week the launch slips is a week of no new users, no feedback and no momentum. We couldn’t afford another delay, so we stopped waiting and took the edit on ourselves.
Working with Claude Code changed the shape of the work. I sat down with it, watched a cut, and said what I wanted: “slower at 0:10”, “this clip of me looks ugly”, “make the background our brand yellow”. A new cut usually came back within minutes, so I could judge the change while the note was still fresh. When an idea didn’t work, we dropped it and tried another.
On the day the edit came back:
| Time after the editor’s cut arrived | |
|---|---|
| Audio fixed and captions added | 17 minutes |
| First cut rebuilt from the raw footage, at 720p, including downloading 29 GB of footage | about 2 hours |
| First 4K master | about 6 hours |
| Final 4K master, after more than 20 rounds of notes | about 16 hours |
Being able to iterate that fast is what got our launch back on track. We could make every decision ourselves, on the spot, and see the result straight away. The rest of this post is how that worked.
Cutting on words
Claude logged all ten clips: the set-up, the lines covered, and where I stumbled. Then it transcribed every take with Whisper, keeping the timing of each word.
With word timings, picking the best take becomes a list. Each line of the script gets a take, and sometimes a crop:
{ "line": 4, "take": "C999", "crop": [2880, 1620, 830, 140] }A script turns that list into the edit. It cuts each line at the quietest 30 milliseconds of the pause next to it, so a cut never lands inside a word, and reads each stretch straight from the 4K source. The first full cut, about 85 seconds drawn from seven takes, assembled in 44 seconds.
We reviewed at 720p and ungraded on purpose, so we could settle the pacing before spending time on polish.
Scenes as code
Every animation in the film is a web page. HyperFrames renders HTML and GSAP animation to video frame by frame, so the same code always produces the same frames.
That made two things easy. First, each scene can land on my words. The four icons appear as I say “building, testing, shipping and improving”, because the animation reads the transcript:
const at = (w) => L(BF.at('engine', w))
const BEATS = [at('building'), at('testing'), at('shipping'), at('improving')]
The sound effects use the same timings, so a soft thud lands on the word “broken”. When the edit changes, a script re-transcribes the voice, and every scene and sound moves with it.
Second, the product on screen is real UI. The app being tested in the film, Acme Notes, is a staged demo project: our product’s real components running on made-up data. We could show a real flow without showing anyone’s data. The bug on screen, a revoked share link that keeps working for a minute, is the kind Deep Scan finds.
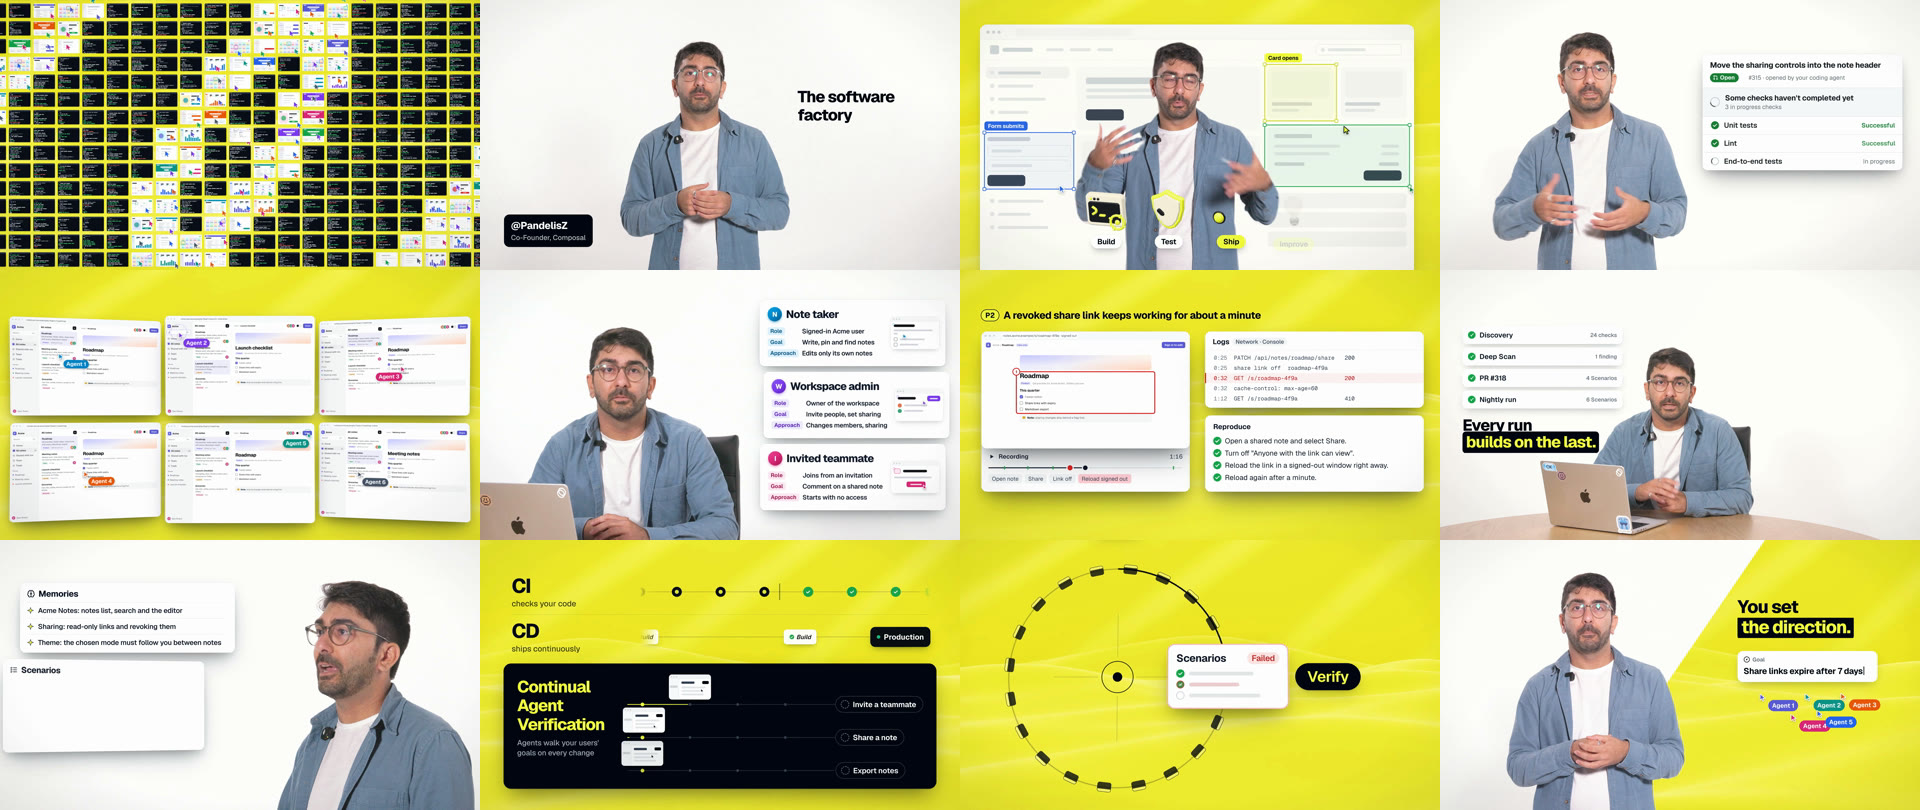
Claude split the 17 scenes between itself and four helper agents, each building its share in parallel. Every scene was tested on its own. It had to pass the renderer’s checks, and it couldn’t sit still for more than a second and a half.
The rest came from the same toolbox:
- 3D icons: the same models we use on our website, rendered frame by frame in Three.js.
- Yellow background: a moving plate generated with Seedance through Runway. It came out mustard, so Claude recoloured it to our brand yellow.
- Cut-outs: where I stand on the yellow set, a local model removes the studio behind me.
- Score: original, and written in code so its last chord lands on the end card.
Directing in plain words
I gave notes the way I would to a person, with a timestamp and often a screenshot:
- “The motion at 10 seconds is a little bit too fast.”
- “At 18 seconds, the text kind of goes over my face.”
- “At 27 seconds, that clip of me side on looks really ugly. Use a different clip.”
- “Let’s make the background our brand yellow.”
- “I can be on white, but the assets we cut to can be on the yellow.”
- “Need some more variety in those fake UIs when we zoom out.”
Each note came back as a fresh 720p cut, usually within minutes. When I asked for a better opening, Claude built several concepts to choose from. We went from a flow field of cursors, to a grid of app windows forming our logo, to the version in the film. There, the logo is made of terminals running coding agents, and every window around it is a different app.

The colour grade
The grade took the most rounds. A LUT is a lookup table that maps the flat camera colours to finished ones. No stock LUT suited this footage in this studio, so Claude wrote one from Canon’s published Log 2 curve.
The first attempt looked hazy. The camera files are flagged as full range, but Canon’s curve expects legal-range values. Correcting that one assumption made the blacks black and the studio white.
After that I kept saying it looked wrong: first “a little green”, then “completely blown out” on my face. So Claude stopped judging by eye.
- It sampled my forehead, hands, hair, shirt and the background in a reference still I liked.
- It searched the grade settings until the same spots in our footage matched.
- When the bright side of my face clipped, it added those highlights to the measurement.
- When I still saw green, it traced it to the shadowed side of my face and neck, not the lit skin, and moved those mid-tones toward magenta.
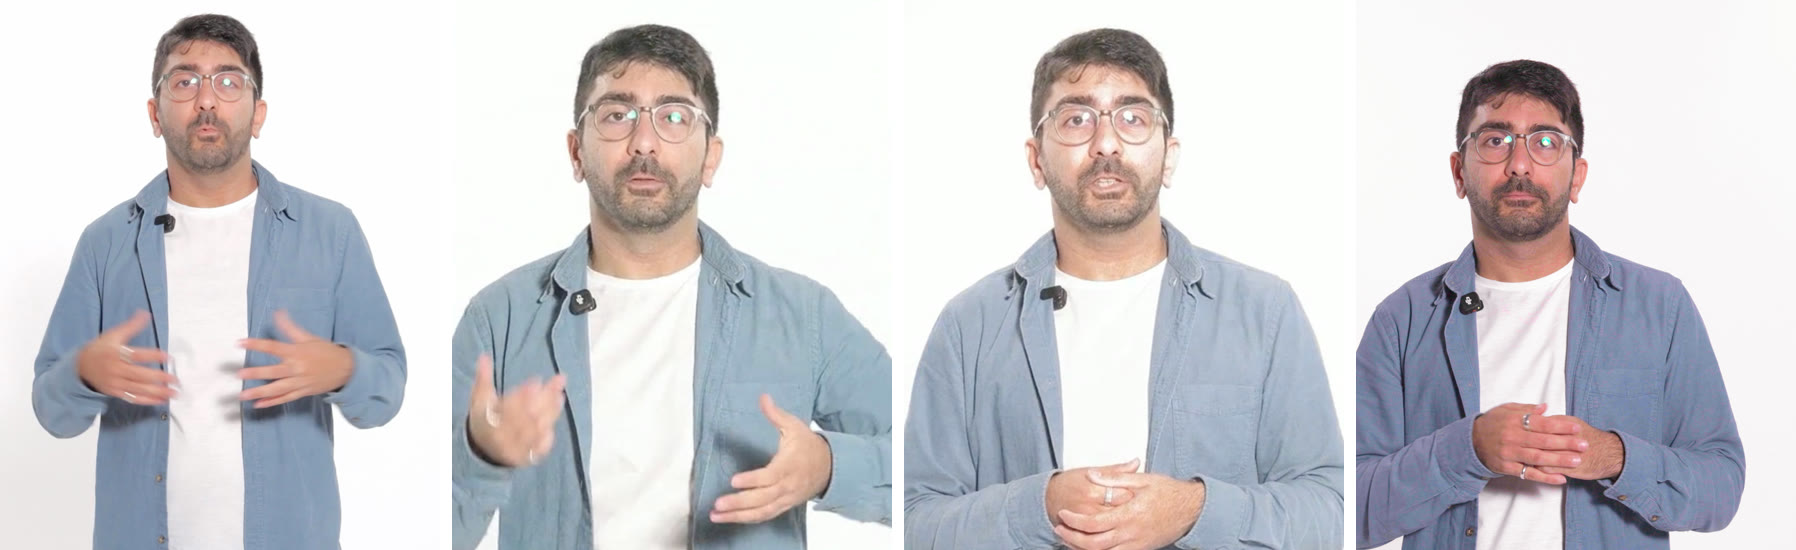
One mistake is worth passing on. Applying the LUT to a cut-out that had already been compressed to 8 bits left blotches on my shirt. The fix was to grade the original footage first, then cut me out of that.
Shipping it
Once I signed off on the 720p cut, the 4K master was a re-render:
- The main footage was rebuilt from the 4K originals with the grade.
- The cut-outs were redone at full resolution.
- Every scene was drawn at 3840 by 2160 rather than scaled up.
The final file is 82.5 seconds long and 310 MB.
The same project produced everything else we needed for launch day:
- a vertical cut for TikTok and Shorts, with captions burned in;
- a YouTube thumbnail, built as an editable web page;
- standalone clips for X with no voice, just the animation and its sounds;
- a looping GIF for the Launch YC page, on white so it blends into the page.
What went wrong along the way
Claude made plenty of mistakes. Most were caught by checking frames before anything reached me:
- The first remix ducked the music by 30 dB, so it vanished. It settled at 12 to 20 dB.
- A transcription error placed one word late, then used it twice.
- One render finished suspiciously fast, so Claude checked its frames before sending it.
- A stray bracket made the 3D icons disappear. The browser console showed where.
- The Y Combinator logo was first drawn with rounded corners. The fix was to use YC’s own logo file from their website.
If you want to do the same
- Shoot log, in 4K, from more than one angle, and read the whole script several times. You’ll cut between takes line by line, and you’ll crop.
- Ask for the raw files and separate audio tracks, not just the export. We had to rebuild our audio from a finished mix.
- Transcribe every take with word timings. Choosing takes, cutting at pauses and timing animation all start there.
- Make the motion graphics code. A note like “slower at 0:10” becomes a one-line change and a re-render, and every scene can land on a word.
- Review at 720p, sign off, then render 4K. Every round goes faster.
- Grade by measurement. Pick a reference still, sample skin, hair and whites, and protect the highlights on faces.
- Keep the voice well above the music. About 12 to 20 dB while you speak, with the music ducking under you, and around -14 LUFS overall.
- Give notes with a timestamp and a screenshot. “At 0:18 the text is over my face” gets fixed in one round.
- Export the extras from the same project. Once the scenes exist, a thumbnail, a vertical cut, GIFs, clips and captions take minutes each.
The toolbox: Claude Code, HyperFrames, GSAP, Three.js, ffmpeg, Whisper, Demucs, Seedance on Runway, and ElevenLabs sound effects.
We build Composal, where agents test your product the way your users use it. To see what the film is about, start your verification journey.